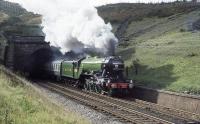
Blea Moor Tunnel

Looking up the hill on 29 March 2014 from what had been shaft 1 of Blea Moor tunnel towards shafts 2 and 3. The shafts are where the navvies brought rock from the tunnel to the surface and with great precision linked the excavations from one shaft to the next. Shaft 1 is not a ventilation shaft any longer and hence the green palisade fence on the right.
Location: Blea Moor Tunnel
Original line: Settle and Carlisle Line (Midland Railway)
Photographer: John McIntyre
Contact photographer: John McIntyre
Date: 29/03/2014
Image number: 46868
Tags: TunnelOther photographs of Blea Moor Tunnel on RailScot
 |  |  |  |  |  |  |  |  |  |
